iOS
环境要求
- iOS 11.0 或更高版本。
- XCode 15 或更高版本(App Store 最新要求)。
接入前准备
请联系平台同事获取最新的 SDK 压缩包,解压后选择需要的 framework 和 bundle 导入到您的 project 中。
集成 XDSDK
- 下载的压缩包解压后分为两部分
ThirdSDK和XDSDK,其中所有的 framework 均为静态库,导入后请设置为DO Not Embed,具体说明如下:
必选项:
XDSDK/
- XDAccountSDK.framework  登录
- XDPaymentSDK.framework  支付
- XDCommonSDK.framework   基础库
- XDResources.bundle      资源包

必选的 TapSDK:
ThirdSDK/TapSDK/
- LeanCloudObjc.framework
- TapBootstrapSDK.framework
- TapCommonSDK.framework
- TapLoginSDK.framework
- TapDB.framework

可选项:
TapSDK/CN/ 国内三方 SDK ,按需添加
TapSDK/Oversea/ 海外三方 SDK ,按需添加
- 将 前文中的 XDConfig.json 文件 导入到 XCode 工程中。
- 如果使用 Google 登录或 firebase 埋点,请在 Firebase 后台下载 GoogleService-Info.plist 并添加到项目中。
- XDSDK 目前版本选择了第三方登录则必须包含第三方埋点,反之同理。
添加系统依赖库
请检查项目中是否已自动添加以下依赖项:
LocalAuthentication.framework
AuthenticationServices.framework
SystemConfiguration.framework
Accelerate.framework
SafariServices.framework
Webkit.framework
CoreTelephony.framework
Security.framework
libc++.tdb
AVFoundation.framework
若运行时遇到相关依赖库加载报错,可改为 Optional 尝试(AuthenticationServices.framework iOS 12 以上才支持,请改为 Optional )。
配置编译选项
在 Build Setting 中的 Other Link Flag 中添加 -ObjC。
在 Capabilities 中打开 In-App Purchase 、Push Notifications 、Sign In With Apple 功能。
配置 URL Types
选择应用 TARGETS,点击 Info 标签,展开 URL Types 。添加以下几项 URL Scheme。大括号内为游戏App对应参数,在各自平台的开发者后台获取。
TapTap   :  tt{taptap-client-id}
Facebook :  fb{facebook-app-id}
Google   :  {reversed-google-client-id}
Line     :  line3rdp.{product_bundle_identify}
Twitter  :  tdsg.twitter.{twitter-consumerKey}
或在 Info.plist 中做以下配置,例:
<key>CFBundleURLTypes</key>
<array>
    <dict>
        <key>CFBundleTypeRole</key>
        <string>Editor</string>
        <key>CFBundleURLName</key>
        <string>line</string>
        <key>CFBundleURLSchemes</key>
        <array>
            <string>line3rdp.{product_bundle_identify}</string>
        </array>
    </dict>
    <dict>
        <key>CFBundleTypeRole</key>
        <string>Editor</string>
        <key>CFBundleURLName</key>
        <string>facebook</string>
        <key>CFBundleURLSchemes</key>
        <array>
            <string>fb{facebook-app-id}</string>
        </array>
    </dict>
    <dict>
        <key>CFBundleTypeRole</key>
        <string>Editor</string>
        <key>CFBundleURLName</key>
        <string>google</string>
        <key>CFBundleURLSchemes</key>
        <array>
            <!-- 反转的google client id : com.googleusercontent.apps.**** -->
            <string>{reversed-google-client-id}</string>
        </array>
    </dict>
    <dict>
        <key>CFBundleTypeRole</key>
        <string>Editor</string>
        <key>CFBundleURLName</key>
        <string>taptapinte</string>
        <key>CFBundleURLSchemes</key>
        <array>
            <string>tt{taptap-client-id}</string>
        </array>
    </dict>
    <dict>
        <key>CFBundleTypeRole</key>
        <string>Editor</string>
        <key>CFBundleURLName</key>
        <string>twitter-auth</string>
        <key>CFBundleURLSchemes</key>
        <array>
            <string>tdsg.twitter.feOTAapnuXNFngQ2LktBnCpeF</string>
        </array>
    </dict>
    <!-- 微信 相关 -->
    <dict>
        <key>CFBundleTypeRole</key>
        <string>Editor</string>
        <key>CFBundleURLName</key>
        <string>wechat</string>
        <key>CFBundleURLSchemes</key>
        <array>
            <string>wxbdfbe5dbd3e3c64b</string>
        </array>
    </dict>
    <!-- QQ 相关 -->
    <dict>
        <key>CFBundleTypeRole</key>
        <string>Editor</string>
        <key>CFBundleURLName</key>
        <string>qq</string>
        <key>CFBundleURLSchemes</key>
        <array>
            <string>tencent1106148555</string>
        </array>
    </dict>
    <!-- 微博 相关 -->
    <dict>
        <key>CFBundleTypeRole</key>
        <string>Editor</string>
        <key>CFBundleURLName</key>
        <string>weibo</string>
        <key>CFBundleURLSchemes</key>
        <array>
            <string>wb187877851</string>
        </array>
    </dict>
</array>
配置 Schemes
在应用的 info.plist 中配置以下内容。
<key>LSApplicationQueriesSchemes</key>
<array>
    <string>tapsdk</string>
    <string>tapiosdk</string>
    <string>fbapi</string>
    <string>fbapi20130214</string>
    <string>fbapi20130410</string>
    <string>fbapi20130702</string>
    <string>fbapi20131010</string>
    <string>fbapi20131219</string>
    <string>fbapi20140410</string>
    <string>fbapi20140116</string>
    <string>fbapi20150313</string>
    <string>fbapi20150629</string>
    <string>fbapi20160328</string>
    <string>fbauth</string>
    <string>fb-messenger-share-api</string>
    <string>fbauth2</string>
    <string>fbshareextension</string>
    <string>lineauth2</string>
    <!-- 微博 相关 -->
    <string>sinaweibo</string>
    <string>weibosdk</string>
    <string>weibosdk2.5</string>
    <string>weibosdk3.3</string>
    <!-- QQ 相关 -->
    <string>mqqopensdkapiV2</string>
    <string>mqq</string>
    <string>mqqapi</string>
    <string>tim</string>
    <string>mqqopensdknopasteboard</string>
    <!-- 微信 相关 -->
    <string>weixin</string>
    <string>weixinULAPI</string>
    <string>weixinURLParamsAPI</string>
</array>
配置权限列表
SDK 涉及到的权限请求如下:
| 权限说明 | 配置方式 | 备注 |
|---|---|---|
| 相机权限 | 在 info.plist 中配置 NSCameraUsageDescription 及描述文案。如:请允许 xxx 获取并使用您的相机。 | 客服页面可能需要拍摄相关照片或视频 |
| 麦克风权限 | 在 info.plist 中配置 NSMicrophoneUsageDescription 及描述文案。如:请允许 xxx 获取并使用您的麦克风。 | 客服页面可能需要拍摄相关视频 |
| 相册权限 | 在 info.plist 中配置 NSPhotoLibraryAddUsageDescription 及描述文案。如:请允许 xxx 获取并使用您的相册。 | 客服页面可能需要访问照片 |
配置 IDFA
如果您的应用需要打开 IDFA,则需要:
- 现在
XDConfig.json中idfa_enabled设置为true。 - 在应用中导入下列系统库:
AdSupport.framework
AppTrackingTransparency.framework -> 需要在 Build Phases - Link Binary With Libraries 中设置为 Optional - 在
info.plist中配置NSUserTrackingUsageDescription及对应的文案。
做完上述配置后应用会在您调用初始化时自动尝试请求获取 IDFA 权限,此时会弹出系统的隐私权限请求弹窗。
配置 ASA
如果您在 IDFA 的基础上想要打开 ASA 的数据,则需要在应用中导入下列系统库:
AdServices.framework -> 需要在 Build Phases - Link Binary With Libraries 中设置为 Optional
配置 App 所需能力
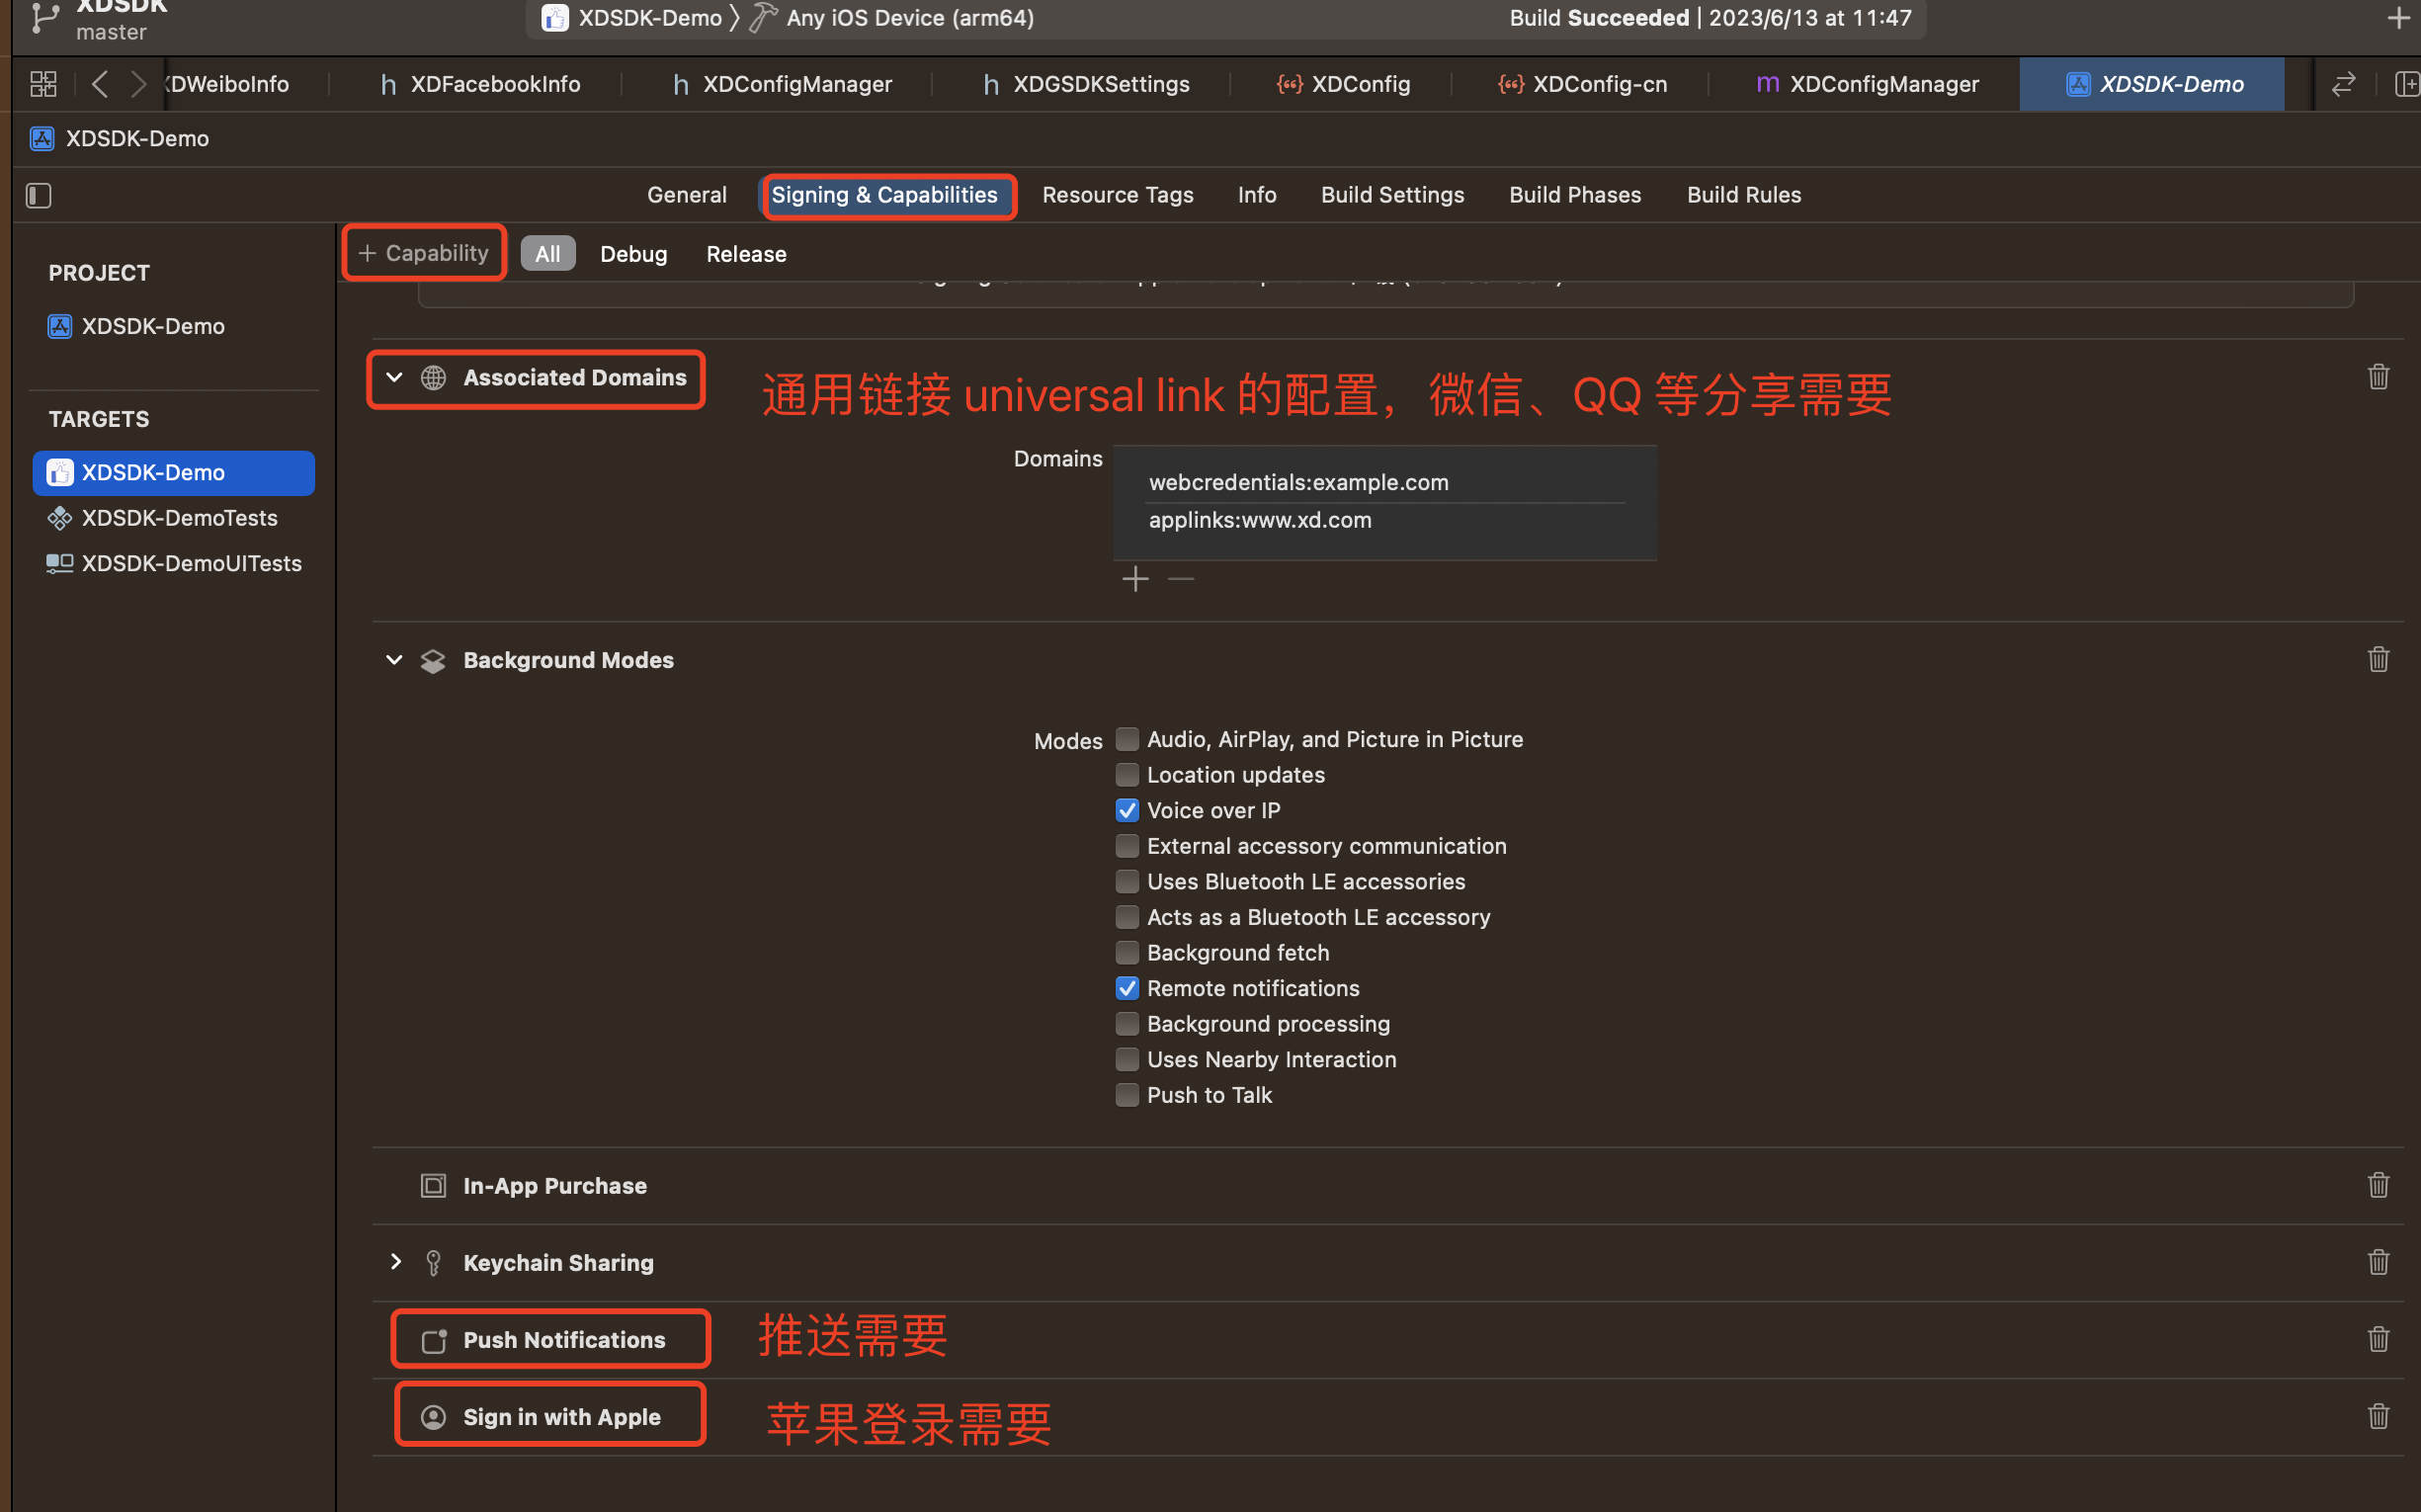
如果您的 APP 具有苹果登录、微信分享、推送等功能,需要在项目的 Target 下,点击 + Capabilities 按钮,添加自己所需的功能,具体开启方式如下图:

如果您的项目并不是一个 Xcode 项目(比如说是Unity项目),您需要生成一个 YourProjectName.entitlements 文件,值得注意的是, Entitlements 里面申请的功能必须和你 iOS 的证书包含的功能一致,否则打包失败 (这个证书功能开启需要到Apple开发者平台去配置。简单一点的话,可以用上述Xcode的+ Capabilities 功能,会自动帮我们配置)。Entitlements 示例如下,不用的可以删掉:
<?xml version="1.0" encoding="UTF-8"?>
<!DOCTYPE plist PUBLIC "-//Apple//DTD PLIST 1.0//EN" "http://www.apple.com/DTDs/PropertyList-1.0.dtd">
<plist version="1.0">
<dict>
    <!-- 苹果推送需要的权限,测试环境配置 development 正式环境配置 production -->
    <key>aps-environment</key>
    <string>production</string>
    <!-- 苹果登录需要的权限 -->
    <key>com.apple.developer.applesignin</key>
    <array>
        <string>Default</string>
    </array>
    <!-- 实现通用链接 universal link 的配置,微信、QQ 等分享需要 -->
    <key>com.apple.developer.associated-domains</key>
    <array>
        <string>applinks:www.xd.com</string>
    </array>
</dict>
</plist>
最后在 Build Setting -> Code Signing Entitlements 的路径里配置成你生成的 Entitlements 文件。